
I’ll never forget the morning I woke up in Istanbul knowing that by the end of the day, I’d walk out with a new hairline. For years, I’d delayed getting a Turkish hair transplant — mostly because I didn’t know what to expect.
So in this post, I’ll take you through exactly what my 7-hour hair transplant day at Clinicana was like — hour by hour — from check-in to recovery.
If you’re still researching or nervous about booking, I’ve put together a free resource that explains everything I wish I’d known before going: 8 Things I Wish I Knew Before Booking My Hair Transplant in Turkey.
The Morning of the Surgery — Check-In And Final Consultation
My day began around 7:30 a.m. when the private driver collected me from the Naz City Hotel Taksim (which is included in the Clinicana package) and took me to the Acıbadem Taksim Hospital, where Clinicana is based. From the moment I arrived, it was clear that this wasn’t some backstreet clinic — it’s a proper hospital setting regulated by the Turkish Ministry of Health and ISO 9001 certified.
After checking in and signing consent forms, I met my surgeon, Dr. Soner Tatlıdede, for a final consultation. We reviewed my medical history, discussed my goals, and he carefully designed the new hairline using a surgical marker. I appreciated that nothing was rushed — the team’s attention to detail immediately put me at ease.
According to the World Health Organization, choosing a medically regulated provider is crucial for anyone travelling abroad for surgery. Clinicana clearly met that standard.
Once my new hairline was drawn and approved, it was time to get started.
Hour 1–2: Donor Area Preparation and Local Anaesthetic
The nurses began by trimming and sterilising the back of my head — known as the donor area. This is where healthy follicles are taken from before being implanted elsewhere.
Then came the local anaesthetic. I won’t lie — the first few injections felt like small pinches, but within minutes, my scalp went completely numb. After that, I couldn’t feel a thing.
Clinicana uses the FUE method (Follicular Unit Extraction), which involves removing individual grafts using a micro-punch device. As the Mayo Clinic explains, this is a minimally invasive approach that reduces scarring and speeds up recovery compared to older strip methods.
By this point, my nerves had settled. The team worked with quiet focus — sterilised equipment, clear communication, and constant checks on my comfort.
Next came the longest but most fascinating part — harvesting the grafts.
Hour 2–4: Graft Extraction (FUE Phase)
This part of the process took about 3 hours. I was lying face-down while the technicians used a tiny motorised punch to extract grafts one by one. Each graft contained between one and four hairs, depending on its natural grouping.
Although I couldn’t feel pain, I could sense light vibrations as each follicle was removed. The technicians placed them into a special saline solution to keep them alive until implantation.
For context, a PubMed study on FUE outcomes reports an average graft survival rate of 85–90%, which aligns closely with what my surgeon told me.
Around midday, I was given a break for lunch — simple and great (typical hospital) food brought to my chair. I remember thinking how surreal it was: I was halfway to a new hairline, and everything felt so calm.
Then it was time to move from extraction to artistry — creating the channels where the new hairs would grow.
Hour 4–6: Recipient Site Creation (Hairline Design and Channel Opening)
This is the stage where the surgeon’s skill truly shines. Using sapphire-tipped blades, the technicians created tiny incisions (known as “channels”) across my recipient area. Each channel determines the direction, angle, and density of new hair growth.
According to the International Society of Hair Restoration Surgery (ISHRS), the angle and orientation of these incisions are what make or break a natural-looking result. Watching how methodical and steady the surgeon was gave me full confidence.
I was led on my back at this point and was perfectly comfortable, occasionally stretching or chatting with the team. This part took roughly two hours, and while it sounds technical, it was surprisingly comfortable.
Once every channel was made, it was time for the final and most exciting step — placing the grafts.
Hour 6–7: Graft Implantation
By now, the team had prepared around 3800 grafts ready for implantation. Several technicians worked simultaneously under the surgeon’s supervision, carefully inserting each graft into the channels.
The sensation was strange but painless — I could feel a light tapping as they placed the follicles. The team constantly sprayed my scalp with saline to keep it hydrated.
The Mayo Clinic notes that hair transplant results depend heavily on graft handling and precision. At Clinicana, each graft was treated like gold — labelled, stored, and implanted with accuracy.
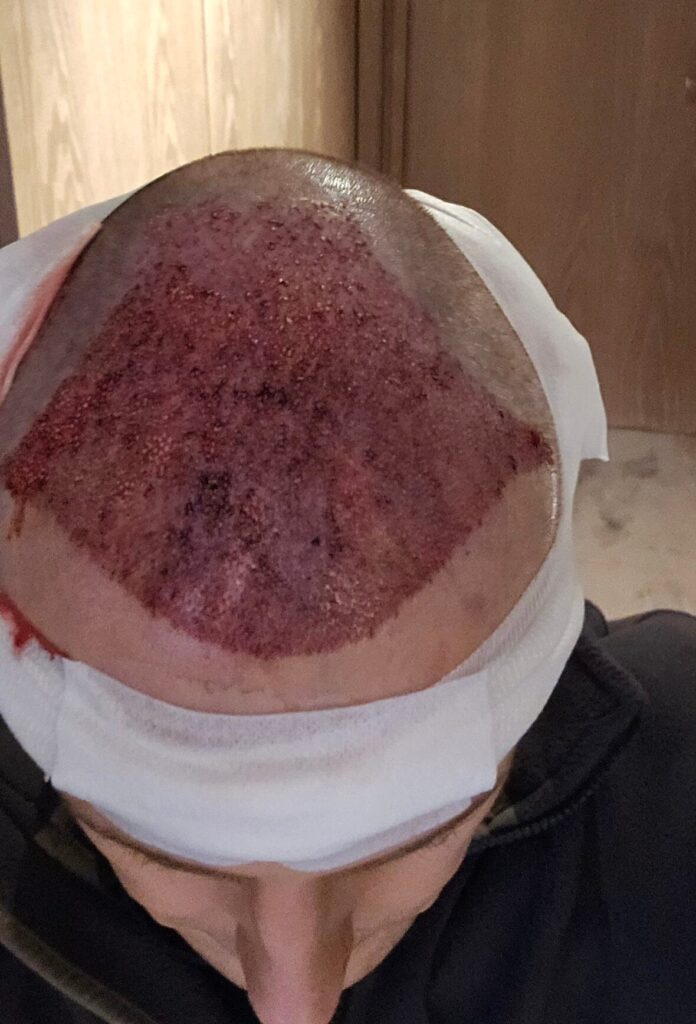
After about seven hours in total (including breaks), we were done. The surgeon inspected the final result and handed me a mirror. My scalp looked red and dotted, but my new hairline was exactly as planned.
Next came the post-surgery briefing and aftercare routine.
Immediately After Surgery — Bandages, Instructions, and First Look
The staff cleaned the donor area, applied bandages, and handed me my aftercare kit — which included a gentle shampoo, a healing lotion, saline spray, and medications for the first few days.
They explained every step of the washing process and how to sleep upright to reduce swelling. I appreciated the clarity — everything was written down, and I also received WhatsApp support in case I forgot anything.
The British Association of Dermatologists stresses that proper post-operative care is key to graft survival, and Clinicana’s system reflected that perfectly.
By 3:00 p.m., I was back in the hotel, tired but satisfied. I didn’t experience pain — just a feeling of mild tightness across my scalp.
But my journey wasn’t over yet — the first night and following morning were just as important.
The First 24 Hours — Hotel Recovery Experience
That evening, I ordered dinner at the hotel and rested while watching TV. The hotel provided extra pillows so I could sleep at a 45-degree angle — essential for reducing swelling.
The next morning, I returned to the clinic for my first scalp cleaning, which is included in the package. The staff gently washed my hair, checked the grafts, and reminded me of the recovery schedule for the next week.
Clinicana’s WhatsApp team were available at all times if needed anything, which I found incredibly reassuring. As the European Academy of Dermatology and Venereology (EADV) notes, continuous post-operative monitoring is a strong predictor of patient satisfaction — and that proved true in my case.
It was only Day 2, and I already felt confident that I’d chosen the right clinic.
Final Thoughts — What I Learned from My 7-Hour Hair Transplant
Looking back, the idea of a “7-hour surgery” sounds daunting, but in reality, it felt like a structured, professional process. Every phase — from consultation to aftercare — ran like clockwork.
Here’s what stood out most from my experience:
- Professionalism: The entire Clinicana team was skilled, calm, and reassuring.
- Comfort: I never felt real pain, only mild pressure during extraction and implantation.
- Transparency: No surprise costs, clear instructions, and constant communication.
- Results: Within months, I had a natural-looking, dense hairline that continues to improve.
If you’re considering getting your own hair transplant in Turkey, preparation is everything. My best advice is to research clinics carefully, ask questions, and understand exactly what to expect on the day.
To make that easier, you can grab my free guide — 8 Things I Wish I Knew Before Booking My Hair Transplant in Turkey — where I share practical tips, clinic checklists, and recovery advice based on my real-world experience.